
Why do printers clog up so easily and what’s the best way to clean the printer head? Well, have you ever noticed that your printouts hardly ever smudge? That’s because of the rapid-drying inks that are now used. However, it’s not just on paper that the ink dries up, it can also clog the printer head if the printer isn’t used regularly. If you’re worried about this, make sure you keep the printer powered on and it will clean itself periodically.
Similarly, don’t wait too long when the cartridges show up as being low on ink. If they’re left to run dry, air can get into the the printhead and prevent the ink from flowing through. It’s also the reason why using our kit cleaning the head can cause colours to stop printing (yes, we have a fix for this!).
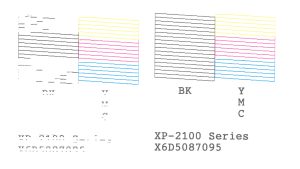
If you think your printhead is blocked, run the nozzle test routine on your printer. This will show you which colours are blocked and offer the option of running the printer’s own ‘maintenance’ or ‘clean print head’ cycle to try and fix it. Try this a few times, or until you stop seeing any improvement: if it gets worse then change the ink as in case that’s causing the issue.
You can also try printing pages of solid colour (PDF here), but if nothing seems to be working it’s worth trying a cleaning kit. The fluid dissolves dried ink and purges air from your printer. It can also used to revive the capping station sponge (where the head parks when not in use).
How-to videos for cleaning printer heads
Very often, a single clean will unclog the head, but it’s more common to need one or two rounds of the self-clean cycle to restore all the segments on the nozzle test. If there are stubborn gaps then try the following troubleshooting strategy…
Troubleshooting
The standard clean can be improved by one or more of the following modifications:
- Using hotter cleaning fluid
- Injecting under higher pressure (this does carry a risk of damaging the head)
- Injecting up to 10ml fluid through each colour (you will need to use paper towel rather than blotting paper if you decide to do this)
- Leaving to stand for up to 30mins after the first flush, then injecting another 1ml fluid
- Using paper towel and rubbing the head back and forth across it (this removes any residue from the underside)
- Putting around 1ml fluid on the capping station sponge (if this dries out the self-clean function is less effective
Try combining all the methods at the same time! You can clean more than one colour at the same time as well.
Your mission is to find out which type of clean the printer responds best to by running them in sequence and printing a nozzle test after each one. I.e.
- Manual head cleaning
- The printer’s self-clean cycle (x2)
- Printing a full page of colour (x2)
Repeat the best cleaning method until any improvement stops. If you’re still missing any segments in the nozzle test then your printer may be beyond repair, but try letting it rest (powered on) for a day. We don’t know why this works but it might be due to allowing time for the blockage to dissolve.
Loss of Print
If a colour drops out completely it’s usually due to air in the head, the cartridge running low or the capping station drying out. Moisten the sponge with 1ml and inject 1ml though the affected colour. Shake the cartridge to check that it’s at least half-full: priming the head needs a good head of ink.
Printer cleaning requires a supply of fresh ink and carries a small risk of damage to the printer. As such, we only recommend using cleaning when other methods (such as the inbuilt cleaning function) have already been tried, and when the printer has no functional use unless fixed.
If you get stuck you can always contact us by email or phone (email is best if outside the UK, due to the time difference)
Hi!
I tried all of the above and found that only my yellow doesn’t work on my Epson Stylus 2200. And I think I also filled-up the maintenance tank as I have an error stating that I have internal parts that need to be “checked” (but that’s another question later).
Any further suggestions?
I’d try to clear the error message first. Google ‘Epson service utility’ which will allow you to reset the counter. Don’t worry about emptying it as the ink is usually dried up.
Mind you, if you’re still able to run the cleaning routine and can’t get the yellow clear then I’d replace the machine.